Garrie AI: Your Cable Guide


How To Wire a Doorbell?
Doorbell wiring is the first electrical system you encounter when entering your home. The electrical system connects a doorbell button, transformer, and chime box to make a functional doorbell system.
Doorbell wiring is one of the easiest electrical systems in your house to install by yourself, though precautions are always key. This guide will walk you through wiring a doorbell step by step, including regular, light switch, and ring doorbell. The article is focused on wired systems.

General Step-by-Step Guide To Doorbell Wiring
Let's start our guide with the regular chime doorbell wiring. Here is what you'll need to wire it:
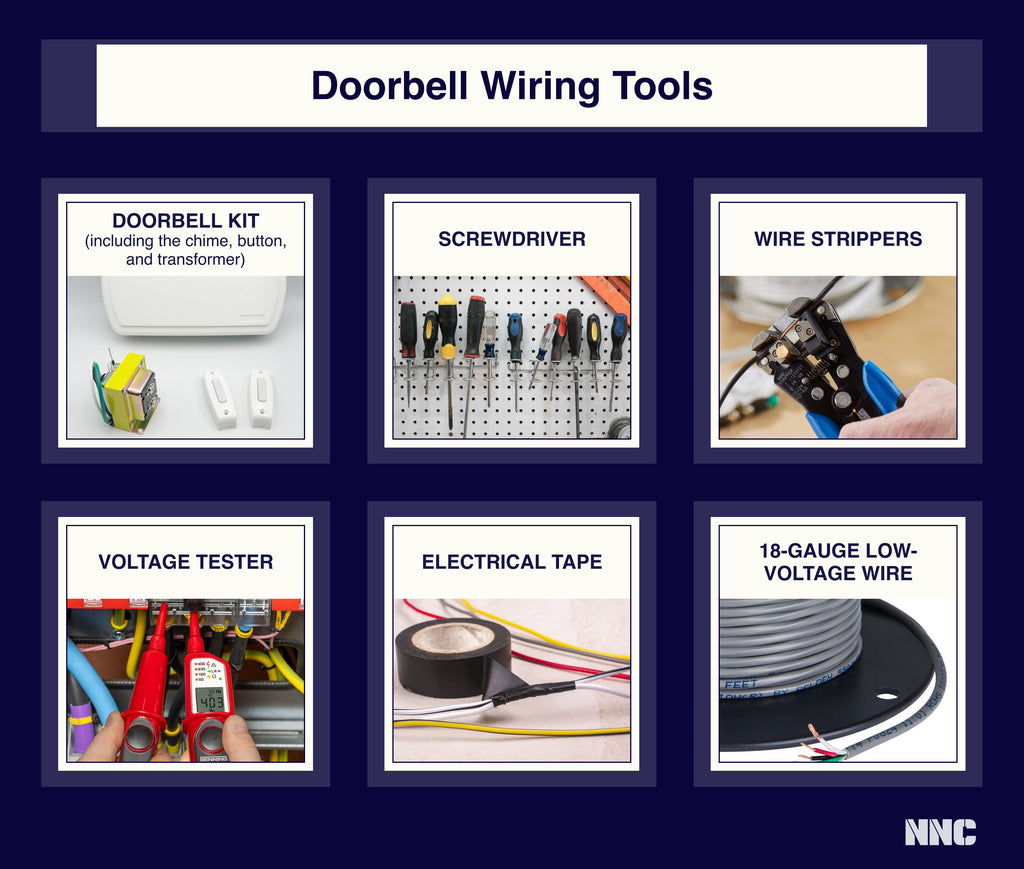
Tools And Materials
- Doorbell kit (including the chime, button, and transformer)
- Screwdriver
- Wire strippers
- Voltage tester
- Electrical tape
- 18-gauge low-voltage wire
Remember to turn off the power at the breaker box to avoid electric shock. Always use a voltage tester to ensure the power is off. Never work on live circuits, and consult the professional with any questions.
General Doorbell Wiring Steps
Note that different manufacturers might have further instructions. Follow them cautiously.
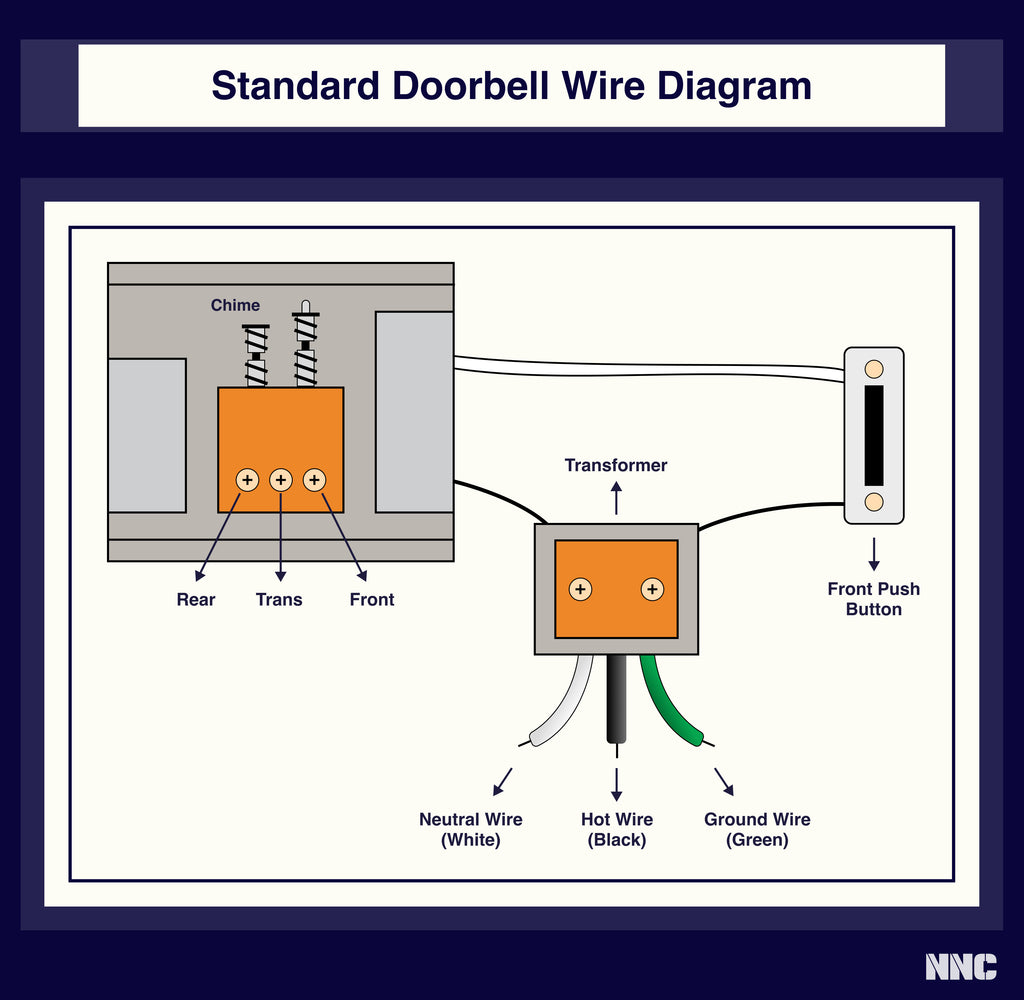
- Locate the Transformer
The transformer steps down regular household voltage to a lower voltage suitable for the doorbell.
2. Install the Chime
- Mount the chime on the wall where you want your doorbell located.
- Run wires from the transformer and the doorbell button to the chime.
- Connect the cables to the chime according to the manufacturer's instructions. Use screw terminals.
- Place the doorbell button near your front door.
- Run a wire from the button to the chime.
- Connect the wires to the button terminals.
- The transformer should have two screw terminals.
- Connect one wire from the doorbell chime to one terminal.
- Connect the second wire from the doorbell button to the other terminal.
- Check if wire connections are secure and cover with electrical tape if necessary.
- The standard wiring follows a simple scheme: one wire from the transformer to the chime, another from the chime to the doorbell.
- Turn the power back on at the breaker.
- Test the doorbell to ensure it's functioning correctly.
Wiring Doorbell From A Light Switch
One of the methods of wiring a doorbell is to do so from an existing light switch from the light switch. This method uses the power from the light switch to operate the doorbell.
This is an excellent option if you have problems with the transformer placement or wish to utilize existing wiring.
So, how is it different from the standard doorbell wiring?
When it comes to tools and materials, there is no transformer since the power is derived from a light switch circuit. You will also need wire nuts and additional electrical wire.
The wiring taps into the electrical line of a light switch. This means that it requires access to live and neutral wires.
Wiring a doorbell from a light switch is more complex than standard doorbell wiring. Here are the unique additional steps for wiring a doorbell from a light switch:
- Access the Light Switch Wiring
- Remove the light switch cover.
- Unscrew the switch and gently pull it out to expose the wiring.
- Locate a live (hot) wire, a neutral wire, and a ground wire.
- You'll need access to the live and neutral wires to power the doorbell.
- The doorbell transformer can be installed near the light switch.
- Connect the transformer to the live and neutral wires.
- The switch's live wire (often black or red) is connected to one transformer terminal.
- The neutral wire (usually white) should be connected to the other terminal of the transformer.
- Use wire nuts to secure the connections and electrical tape to insulate them.
- Run a wire from the transformer to the doorbell chime.
- Run another wire from the chime to the doorbell button.
- Connect these wires according to the doorbell kit instructions.
- Once the transformer is connected, carefully place the switch and transformer back into the wall.
- Replace the switch cover.
- Turn the power back on at the breaker.
- Test the light switch and the doorbell to ensure they function correctly.
Note: Make sure the circuit can handle the additional load of the doorbell.
How To Wire a Ring Doorbell?
Wiring a Ring doorbell means connecting it to your existing doorbell wiring for power and setting it up to work with your Wi-Fi network for its smart features. You can choose whether to connect the ring doorbell to the existing wiring or the battery. Installing a ring doorbell is easier than other methods discussed here, as it relies on the current electrical system.
Ring Doorbell Tools
- Ring Doorbell kit
- Screwdriver
- Drill (if you need to make new holes for mounting)
- Wire strippers (if adjustment of wires is needed)
Ring Doorbell Installation Steps
- Turn Off Power
- Remove Existing Doorbell if Needed
- Mount the Bracket
- Place the mounting bracket at the desired location.
- If you're using the existing holes, line them up accordingly. If not, mark new holes and drill them.
- Secure the bracket with the provided screws.
- If your doorbell has two wires, it's compatible with a Ring doorbell.
- Ensure the wires are not frayed. If they are, strip a small portion to expose fresh wire.
- Loosen the screws on the back of the ring doorbell.
- Attach each wire to a screw on the back of the Ring doorbell. The order doesn't matter for typical setups.
- Tighten the screws to secure the wires.
- Place the Ring doorbell onto the bracket.
- Secure it with the provided security screws.
- Restore power at the breaker.
- Download the Ring app on your smartphone and follow the in-app instructions to connect the doorbell to Wi-Fi.
Notes For Ring Doorbell Wiring
- Check that your home's existing wiring is compatible with your chosen Ring model before shopping.
- You should install the included diode if you have a digital doorbell chime.
- Ensure your ring doorbell is within a good range of your Wi-Fi router for optimal performance.
- Mind that Ring offers battery-powered models if you want to skip wiring altogether.
- For smart doorbells, additional wiring might be required for features like video and network connectivity, although many are designed to work with existing doorbell wiring.
The three instructions above cover basic doorbell wiring installation practices. However, here are some more things you need to know to understand the doorbell system better:
Components of a Doorbell System
- The Doorbell Button is the push-button outside your door that activates the doorbell when you press it.
- Transformer is there to reduce standard household voltage ( 120 or 240 volts) to a lower voltage (16 to 24 volts) suitable for the doorbell system.
- Chime Box: The unit inside your home produces a sound when the doorbell button is pressed.
- Wires: Electrical cables that connect all these components.
How Doorbell Wiring Works
Doorbell wires typically run between three main components:
- The doorbell button (located at your door)
- The chime box (usually mounted inside the home)
- The transformer
Here is how the wiring runs:
- From transformer to chime: The transformer is wired to the chime box. It is often located near your home's main electrical panel, in the basement, attic, garage, or utility closet. The connection from the transformer supplies the chime box with the low-voltage power it needs to operate.
- From chime to doorbell button: Another set of wires runs from the chime box to the doorbell button. When the button is pressed, it completes the electrical circuit. In this way, the current flows from the transformer through the chime box and then to the button, triggering the chime sound.
Cables For Doorbell Wiring
The most common type of wire used for doorbell wiring is 18-gauge, which is suitable for the low voltage required by doorbells (usually between 16-24 volts). In rare cases, a 16-gauge wire can be used if the run is very long.
An 18-gauge low-voltage wire for doorbell circuits is either solid or stranded copper. The wire usually has a PVC plastic coating for short-circuit protection. NNC has different models of this cable at excellent prices.
Color-Coding
Doorbell wires can be color-coded for easy identification. Standard colors include red, white, or green, but the color doesn’t indicate anything specific about the wire’s function in doorbell systems, as doorbell wiring is usually AC (alternating current) where polarity is not an issue.
In some smart doorbells, CAT6 and CAT7 cables can be used instead or in combination with low-voltage wire because the connection to data is required.
Is it Safe to Touch Doorbell Wires?
Generally, it is safe to touch doorbell wires because they carry a low voltage (typically between 16-24 volts AC), which is not enough to cause harm under normal circumstances. However, it is better to be safe than sorry, so it is not to touch the doorbell wire in case of any damage to the wire that you are unaware of.
Do All Doorbells Have 2 Wires?
Most traditional wired doorbell systems have at least two wires. One runs from the transformer to the chime and another from the chime to the doorbell button.
In a basic setup, these two wires complete the circuit necessary to power the chime when the button is pressed.