Garrie AI: Your Cable Guide


How do you wire an outlet from another outlet?
Why Wire Outlet From Another Outlet?

Wiring one outlet from another, or "daisy-chaining," is common in residential and commercial electrical installations for several reasons. This method allows for the extension of electrical power to different parts of a room or building from a single circuit without running individual wires back to the primary service panel for each outlet. Here are the main reasons why this method is used:
Efficiency in Wiring
Daisy-chaining outlets from one to another is an efficient way to connect multiple outlets throughout a space. It reduces the wiring needed, as you don't have to run separate cables from the primary power source to each outlet. This can save on both materials and labor.
Cost-Effectiveness
Running fewer wires from a central point (such as the electrical panel) to each outlet can significantly reduce costs. It saves on the amount of electrical wire needed and reduces the time electricians need to install the wiring, making the overall project more cost-effective.
Simplicity and Convenience
Wiring outlets in this manner simplifies the electrical layout of a building. It can make adding outlets to a room easier without significantly altering the existing electrical infrastructure. This approach can be particularly convenient when retrofitting or updating rooms.
Space and Aesthetic Considerations
By reducing the number of wires that need to run through walls, ceilings, and floors, daisy-chaining can help maintain the structural integrity of a building and minimize the visual impact of electrical installations. This is especially important in finished spaces where aesthetics are a consideration.
Flexibility
Daisy-chaining outlets allow for a flexible electrical layout that can be easily expanded. If there's a need for additional outlets in the future, it's often simpler to extend from an existing daisy-chained outlet than to run a new line from the main panel.
Safety and Code Compliance
While daisy-chaining outlets can be practical and efficient, ensuring the installation complies with local electrical codes and standards is essential. Overloading a circuit by connecting too many outlets or high-power appliances can pose a fire risk.
When planning to wire an outlet from another outlet, consider the total load that will be placed on the circuit to avoid potential hazards.
How Much Does It Cost To Rewire An Outlet From Another Outlet?
The cost to rewire an outlet from another can vary based on several factors, including the job's complexity, the distance between the outlets, the type of wiring and materials required, and whether you hire a professional or do it yourself. Here's a breakdown of potential costs:
DIY Costs
If you decide to tackle the project yourself, your primary expenses will be materials:
- Electrical Wire: Depending on the length needed and type (e.g., 14/2 or 12/2 NM cable for typical residential applications), the cost can range from $0.50 to $1.00 per foot or more.
- Outlet (Receptacle): A standard 15-amp or 20-amp outlet can cost between $1 and $5, though specialty outlets (GFCI, USB-equipped, etc.) will cost more.
- Electrical Box (if needed): If you're adding a new outlet rather than just rewiring an existing one, you'll need a new one, which can cost $2 to $5.
- Miscellaneous Supplies: This can include wire nuts, electrical tape, and wall plates, adding another $5 to $10 to your total.
For a simple rewire where materials are all needed, the DIY cost might range from $10 to $50 or more, depending on the project's specifics and the quality of the materials you choose.
Professional Installation Costs
If you hire an electrician to do the work, the cost will include labor and materials. Labor rates vary widely by location and the professional's experience level but typically range from $40 to $100 per hour, with many electricians charging a minimum fee for small jobs.
A professional might charge a flat rate or a minimum service fee for a straightforward job like rewiring an outlet from another outlet. The total cost can range from $100 to $250 or more, including materials, especially if the job involves running new wiring through walls or floors, which can increase the time and complexity of the project.
Factors Affecting Cost
- Distance Between Outlets: Longer distances require more wire and potentially more installation time, increasing the cost.
- Accessibility: Difficulty in accessing the wiring or outlets (e.g., working in tight spaces, opening walls) can increase labor costs.
- Local Building Codes: Compliance with local codes may require additional steps or materials, impacting the overall cost.
- Type of Building: Working in commercial buildings or apartments may present different challenges compared to single-family homes, potentially affecting the cost.
How do you prepare a running outlet from another outlet?
Assess and Plan
- Identify the power source outlet: Choose an existing outlet that will serve as the power source for the new outlet. This outlet should have the capacity to handle the additional load.
- Determine the location of the new outlet: Consider where you need the additional outlet, considering the practicality of running wire between the two points.
- Consider the circuit load: Check the overall load on the circuit to ensure adding another outlet won’t overload it. The total wattage of all devices connected to the circuit should not exceed 80% of the circuit’s capacity (e.g., 1920 watts for a 15-amp circuit at 120 volts).
Gather Materials and Tools
- Electrical Wire: Use the appropriate gauge of wire (e.g., 14/2 for a 15-amp circuit, 12/2 for a 20-amp circuit). The “2” indicates two insulated conductors plus a ground wire.
- Outlet (Receptacle): Choose an outlet that matches the amperage of the circuit.
- Electrical Box: If you’re adding a new outlet, you’ll need an electrical box for installation.
- Wire Connectors: For connecting wires.
- Faceplate: To cover the outlet.
- Tools: Wire stripper, screwdrivers, drill with bits for cutting through walls or floors (if necessary), fish tape for pulling wire, voltage tester.

Turn Off the Power
- Ensure safety by turning off the power to the outlet you’re working on at the circuit breaker. Verify the power is off using a voltage tester.
Prepare for Installation
- Measure and Cut Openings: If you need to run wire through walls or floors, measure carefully and cut any necessary openings for the new electrical box.
- Run the Wire: Plan the route from the source outlet to the new outlet. If you’re going through walls or floors, you may need to drill holes through studs or joists. Use fish tape to pull the wire through the cavities.
Wiring Considerations
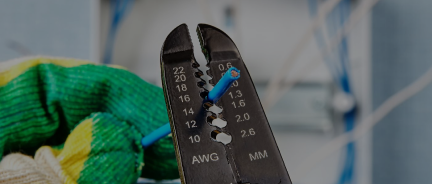
- Stripping and Preparing Wires: Strip the insulation from the ends of the wires to expose the copper for connections. Typically, you'll expose about 3/4 inch of wire.
- Connecting to the Source Outlet: You can either pigtail the connections (joining the new wires to the existing wires with wire connectors and running a single set of wires to the outlet terminals) or, if the outlet allows, connect the new wires directly to the additional terminals on the outlet. Ensure you connect wires to the correct terminals (hot to brass, neutral to silver, ground to green).
-
Finalize the Installation
- Secure the Wires: Attach the wires to the new outlet, secure the outlet in the box, and attach the faceplate.
- Test Your Work: Once everything is installed, turn the power back on and use a voltage tester or a simple plug-in device to test both the original and the new outlet.
Safety Tips
- Always follow local building codes and regulations.
- Use caution when working with electricity. If you’re not confident in your ability to safely complete the task, consider hiring a professional electrician.
- Make sure all connections are secure and that wire insulation is not damaged.
When You Can Wire an Outlet from Another Outlet
- Within Load Capacity: If the existing circuit and the outlet you're tapping from have enough capacity to handle the additional load of the new outlet without exceeding the circuit’s maximum rating (typically 15 or 20 amps for residential circuits).
- For Light to Moderate Use: For additional outlets intended for light to moderate use, such as charging devices, lamps, or small appliances, where the cumulative load is within safe limits.
- In Compliance with Code: When the addition complies with local building and electrical codes, which may specify limits on the number of outlets per circuit, types of loads, or specific requirements for certain rooms (e.g., GFCI protection in wet areas).
- With Proper Wiring Practices: Use the correct gauge of wire (e.g., 14-gauge for 15-amp circuits, 12-gauge for 20-amp circuits) and ensure all connections are secure and properly insulated.
When You Cannot (or Should Not) Wire an Outlet from Another Outlet
- Circuit Overload: If adding another outlet to an existing circuit would result in an overload, potentially causing circuit breakers to trip or, worse, creating a fire hazard.
- High-Power Appliances: Dedicated circuits are required for high-power appliances such as refrigerators, stoves, microwaves, space heaters, and air conditioners. These appliances should not share circuits with other outlets to prevent overloading.
- Wet or Hazardous Areas: In bathrooms, kitchens, garages, outdoors, or any area exposed to moisture, specific types of outlets (e.g., GFCI outlets) and wiring practices are required for safety. Wiring a standard outlet from another outlet without considering these requirements can be dangerous.
- Violation of Electrical Codes: Local and national electrical codes set forth specific regulations concerning the wiring of outlets, including the number of outlets on a circuit, the placement of outlets, and the use of AFCI (Arc Fault Circuit Interrupter) or GFCI (Ground Fault Circuit Interrupter) protection. Wiring that violates these codes is not permitted.
- Inadequate Wiring: If the existing wiring is old, damaged, or does not meet current standards (e.g., knob and tube wiring), it's unsafe to add additional load without first upgrading the wiring.
- Complex Configurations: Certain wiring configurations or specialized circuits (e.g., for home theaters, workshops, etc.) might require professional design and installation to ensure safety and functionality.
How can you add an electrical outlet from an existing outlet outside?
Adding an outdoor outlet from an existing one requires careful attention to detail and adherence to safety standards, particularly regarding weather protection and GFCI use.
Safety and Planning
- Turn Off Power: Ensure safety by turning off the circuit breaker feeding the existing outdoor outlet. Use a voltage tester to confirm the power is off.
- Assess the Existing Outlet: Verify that the existing outdoor outlet is GFCI-protected. This is crucial for outdoor settings to prevent shock hazards due to moisture.
- Determine Load Capacity: Check if the existing circuit can handle the additional load of another outlet without exceeding its capacity.
Gather Materials and Tools
- Weatherproof Electrical Box: Choose a weatherproof box if the new outlet will be exposed to the elements.
- GFCI Outlet: For added safety, use a GFCI outlet for the new installation, especially if the existing outlet is not GFCI-protected.
- Outdoor Cover: Ensure you have a weatherproof cover for the new outlet to protect it from moisture and debris.
- Electrical Cable: Use an outdoor-rated cable (e.g., UF-B cable) appropriate for the amperage of your circuit.
- Conduit: If required by local codes or for added protection, use conduit suitable for outdoor use.
- Tools: You’ll need a screwdriver, wire stripper, drill, and possibly a saw if you need to cut through any material to run the new cable.
Installation Process
- Access the Existing Outlet: Remove the cover and outlet from the existing electrical box. Disconnect the outlet, taking note of how the wires are connected.
- Run Cable to the New Location: Plan the route from the existing outlet to where you want the new outlet. If you’re using conduit, attach it to the existing box, run it to the new location, and then thread the cable through the conduit.
- Install the New Electrical Box: Cut an opening for the new electrical box at the desired location. Secure the box, ensuring it's adequately sealed against the wall.
- Wire the New Outlet: Strip the ends of the wires and connect them to the new GFCI outlet (black wire to the brass screw, white wire to the silver screw, and bare copper wire to the green screw). Then, attach the GFCI outlet to the new electrical box and cover it with a weatherproof cover.
- Reconnect the Existing Outlet: You can either pigtail the connections in the existing box (joining the new and existing wires with wire nuts and a short piece of wire leading to the outlet) or, if the outlet and box have capacity, connect the new wires directly to the existing outlet. Ensure GFCI protection is in place either at the outlet level or upstream in the circuit.
- Test and Seal: Turn the power back on and test the outlets using a plug tester to confirm proper wiring and GFCI protection. Seal any gaps around the boxes to ensure they are weatherproof.
Safety Checks and Compliance
- Inspect for Code Compliance: Verify that your installation meets local electrical codes, which may specify requirements for outdoor wiring, GFCI protection, and the use of conduit.
- Professional Inspection: If you're unsure about the safety or correctness of your installation, have it inspected by a licensed electrician.
What is the difference between direct outlet and pigtailing methods?
When adding or extending electrical outlets or fixtures, two common methods for connecting the wires are direct wiring (also known as "daisy chaining") and pigtailing. Let's look into the difference between the two.
Direct Outlet Wiring (Daisy Chaining)
- In direct outlet wiring, the incoming power cable (line) and the outgoing cable (load) that leads to the next outlet or fixture are both connected directly to the screws or push-in terminals on the outlet.
- This means the current flows through each outlet or fixture in sequence.
Advantages:
- Simplicity: It's a straightforward method that requires fewer wire nuts and connections.
- Space-saving: With fewer connections in the electrical box, it can be easier to fit everything inside, especially in crowded boxes.
Disadvantages:
- Dependence: If one outlet fails or is removed, it can interrupt the power to all downstream outlets or fixtures on the same line.
- Maintenance: Troubleshooting can be more complex since issues with one outlet can affect others.
Pigtailing
- Pigtailing involves connecting the incoming and outgoing wires to a short third piece of wire (the "pigtail") with a wire nut. The other end of the pigtail is then connected to the outlet or fixture.
- This method ensures that the outlet or fixture can be removed or fail without interrupting the circuit's continuity.
Advantages:
- Continuity: It maintains power continuity to other outlets or fixtures even if one is disconnected or fails.
- Safety: It can be safer in certain situations, reducing the risk of loose connections over time and ensuring all connections are secured with wire nuts inside the electrical box.
- Flexibility: It is easier to troubleshoot and replace outlets or fixtures without affecting the entire circuit.
Disadvantages:
- More connections: Requires more wire nuts and potentially more wiring inside the electrical box, making for a more crowded box and slightly more complex wiring.
- Time-consuming: Slightly more labor-intensive due to the extra steps of cutting and connecting the pigtail wires.
Choosing Between Direct Wiring and Pigtailing
- Consider using pigtailing in critical areas where maintaining power continuity is essential, such as in lighting circuits or where an outlet's failure should not affect the entire chain.
- Pigtailing is often considered more reliable and safer over the long term, especially for connections that will be used or in high-load situations.
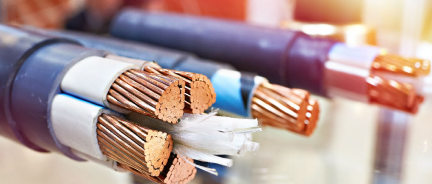
Cables For Wiring Outlet To An Outlet
When wiring an outlet to another outlet, the type of cable you use is crucial for ensuring your electrical system's safety, efficiency, and compliance. The choice of cable depends on several factors, including the amperage of the circuit, the installation environment (indoor vs. outdoor), and local building codes. Here's a guide to help you select the appropriate cable for wiring an outlet to another outlet:
Nonmetallic Sheathed Cable (NM Cable)
- Common Types: NM-B is the most common type used in residential indoor applications.
- Usage: Suitable for dry, indoor applications. It's used in most home wiring projects, including wiring outlets.
- Sizes: Commonly used sizes include 14/2 and 12/2 for 15-amp and 20-amp circuits, respectively. The first number indicates the gauge of the wire, and the second number indicates the number of conductors (not including the ground wire).
- Amperage: Use 14-gauge wire for 15-amp circuits and 12-gauge wire for 20-amp circuits.
Underground Feeder Cable (UF Cable)
- Usage: Uf-B is designed for wet locations and direct burial without conduit. It can be used for outdoor outlets or running cable underground to an outdoor outlet.
- Characteristics: The outer jacket of UF cable is more durable and resistant to moisture and other environmental factors than NM cable.
Conduit Wiring
- Types of Conduit: For outdoor, exposed, or wet locations, wiring might need to be run through a conduit. Types of conduit include electrical metallic tubing (EMT), rigid metal conduit (RMC), PVC conduit, and flexible conduit for specific applications.
- Wire Type: Within the conduit, individual THHN (thermoplastic high-heat-resistant nylon-coated) wires are used. You would typically use black for hot, white for neutral, and green or bare copper for ground.
- Usage: Ideal for outdoor applications, in garages, or where wiring needs extra protection.
Installation Tips:
- Cable Protection: Ensure the cable is protected from physical damage. For example, running cable through bored holes in studs or using conduit where necessary.
- Avoid Overloading: Ensure that adding another outlet does not overload your circuit. Calculate the total load to ensure it does not exceed 80% of the circuit breaker's capacity.
- Secure Wiring: Properly secure the cable to framing members using cable staples or straps, ensuring no damage to the cable insulation.
How To Wire a GFCI Outlet From Another Outlet?
Wiring a GFCI (Ground Fault Circuit Interrupter) outlet from another outlet involves specific steps to ensure safety and compliance with electrical codes. GFCI outlets are crucial in areas prone to moisture, such as bathrooms, kitchens, garages, and outdoors, as they protect against electrical shock by shutting off power if a ground fault is detected. Here’s how to wire a GFCI outlet from an existing outlet:
Tools and Materials Needed
- GFCI outlet
- Screwdriver
- Wire stripper
- Voltage tester
- Electrical cable (appropriate gauge, typically 12/2 or 14/2 for residential)
- Wire nuts (if necessary)

Safety First
- Turn Off Power: Before starting, turn off the power to the circuit at the breaker box. Use a voltage tester on the existing outlet to ensure the power is completely off.
Instructions
1. Prepare the Existing Outlet:
- Remove the faceplate and unscrew the existing outlet from the electrical box.
- Carefully pull the outlet out and use a voltage tester to double-check that there’s no power.
- Identify the line (power supply) wires. If you’re unsure, you may need an electrician’s help.
2. Run Cable to New Location:
- Run an electrical cable from the existing outlet to the new location where you want the GFCI outlet. Ensure you use the correct gauge of cable (12/2 for 20-amp circuits and 14/2 for 15-amp circuits) and that it's suitable for the environment (e.g., use UF cable for outdoor or damp locations).
3. Prepare the GFCI Outlet:
- GFCI outlets have LINE and LOAD terminals. The LINE terminals connect to the power source. The LOAD terminals can provide GFCI protection to downstream outlets but will be unused in this simple setup unless you intend to protect additional downstream outlets.
- Strip about 3/4 inch of insulation from the wires at both ends of the new cable.
4. Connect the Wires at the Existing Outlet:
- If you’re not extending protection or adding to the circuit, simply run the new cable directly to the new GFCI location without altering the connections at the existing outlet.
- If the existing outlet is part of a series and you want to extend GFCI protection, you might need to rewire to ensure the existing outlet and any further downstream are protected via the new GFCI’s LOAD terminals.
5. Wire the GFCI Outlet:
- Connect the black (hot) wire to the brass screw on the LINE side, the white (neutral) wire to the silver screw on the LINE side, and the bare copper (ground) wire to the green grounding screw.
- If extending protection downstream, connect outgoing (to the next outlet) black and white wires to the LOAD terminals, respectively.
6. Install the GFCI Outlet:
- Carefully push the wires back into the box, ensuring they’re not overly bent or pinched.
- Screw the GFCI outlet into the box and attach the faceplate.
7. Test Your Work:
- Turn the power back on at the breaker.
- Use the GFCI’s test button to trip the outlet, then reset it to ensure it’s working properly.
Important Considerations
- GFCI Placement: Ensure the GFCI outlet is accessible for testing and resetting. GFCIs in hard-to-reach locations are not recommended.
- Double Check: If using the GFCI to protect additional downstream outlets, ensure wiring is correct to prevent improper protection.